
Successfully installing a flat pack kitchen transforms an affordable product into a high-end centerpiece, requiring methodical preparation and precision execution. This comprehensive blueprint guides...
Successfully installing a flat pack kitchen transforms an affordable product into a high-end centerpiece, requiring methodical preparation and precision execution. This comprehensive blueprint guides you through assessing your capabilities, mastering essential upfront logistics like measurement and tool selection, and navigating the structural steps to secure your new cabinetry. You will learn how to weigh material durability against customization limits and establish the correct assembly environment before tackling the detailed securing and finishing touches that define a professional outcome. By adhering to these established methodologies, you gain the knowledge to bridge the gap between budget-friendly components and lasting aesthetic quality.
While flat pack kitchen installation is often marketed as a simple weekend project, the reality involves a steep but manageable learning curve. Assembling the individual flat pack cabinets is generally straightforward, but the technical difficulty spikes during the leveling and securing phase. Achieving a professional finish requires extreme patience; an error of just a few millimetres at the start of a cabinet run can lead to significant misalignments or unusable benchtop surfaces by the end. If you are comfortable using a spirit level, power drill, and scribing tools, you can successfully manage the installation—provided you respect the precision required for a flush finish.
| Kitchen Scale | Estimated Assembly Time | Estimated Installation Time |
|---|---|---|
| Small / Galley | 1–2 Days | 2–3 Days |
| Medium / L-Shape | 2–3 Days | 3–5 Days |
| Large / Island | 4–6 Days | 7+ Days |
If the scale of the project feels overwhelming, you may decide to outsource the labour. However, choosing the right trade is critical: while a general builder is ideal for structural renovations or wall removals, a qualified cabinet maker is the superior choice for the installation itself.
The “why” comes down to tolerances. Builders typically work with larger margins, whereas cabinet makers operate with millimetre-perfect precision. Flat pack systems rely on perfectly plumb and level carcasses to ensure that soft-close hinges and drawer runners function without catching. A cabinet maker brings specialized scribing tools and an eye for fine millwork that ensures your custom-made kitchen looks like a bespoke architectural install rather than a standard kit-build.
Once you have decided between a DIY approach or professional help, the focus shifts to the foundational work required before a single box is opened.
A successful flat pack kitchen installation begins long before the first cabinet is assembled. Precise planning ensures that your components fit snugly and that your workspace remains functional. Use our Kitchen Design & Planning Guide to establish your preliminary layout before moving into the physical preparation phase.
Inaccurate measurements are the leading cause of delays in DIY kitchen projects. To avoid costly mistakes, follow this systematic approach to mapping your space:
1. Wall Measurements
Never assume your walls are perfectly straight or square. Measure the length of every wall at three different heights: floor level, benchtop level (900mm), and eye level (1500mm). Use the smallest measurement as your guide to ensure cabinets aren’t wedged into a narrowing space.
2. Accounting for Utilities
Identify the exact centre-points for your plumbing, gas lines, and electrical outlets.
3. Mastering the Corners
Corners are the most complex part of any layout. You must account for handle clearance. If a drawer or cupboard door is positioned directly against a perpendicular cabinet, the handle will likely prevent the drawer from opening fully.
[insert diagram here: A technical drawing showing the 3-point wall measurement technique and a zoomed-in detail of handle clearance in a corner]
Before you begin, ensure you have the correct equipment to maintain safety and precision. For detailed advice on using power equipment, refer to the DIY Tool Safety Guide (SafeWork Australia).
Essential Tools:
Optional (But Recommended) Tools:
Deciding whether to install flooring before or after your cabinets depends on your flooring material and budget.
[insert comparison table: Pros and Cons of “Flooring First” vs. “Cabinets First”]
With your measurements finalised and tools ready, you can move on to inspecting your delivered materials to ensure every panel and screw is accounted for.
Achieving a high-end finish with flat pack kitchen installation depends on the balance between selecting premium materials and understanding the technical limits of modular units. While the primary appeal of flat packs is the significant cost savings, the longevity of your kitchen relies on the quality of the substrate and hardware used.
Not all flat packs are created equal. For a kitchen to withstand the humidity and heavy use typical in Australian homes, prioritize High-Moisture Resistant (HMR) particleboard or MDF for the cabinet carcasses.
While flat packs are designed as modular systems, most Australian kitchens require some level of customization to fit perfectly between walls.
It is important to differentiate between modular units and custom-cut panels. Most standard flat pack cabinets come in fixed increments (e.g., 300mm, 450mm, 600mm). If your wall space is 620mm, you cannot simply “shrink” a 600mm cabinet; instead, you utilize filler panels (also known as fillers or scribes) to bridge the gap.
[insert image showing a filler panel being scribed to a wall here]
If you require specific dimensions beyond standard sizes, sourcing [Australian Made Flat Pack Kitchen Cabinets](https://pinnacleflatpacks.com.au/products/flat-pack-kitchen-cabinets/) allows for greater flexibility. However, keep these limits in mind:
The following table outlines the estimated savings when choosing a DIY flat pack kitchen installation over hiring a professional cabinet maker or installer.
| Expense Item | Professional Installation (Estimated) | DIY Installation (Estimated) |
|---|---|---|
| Labor Rate | $80 – $120 per hour | $0 (Sweat Equity) |
| Assembly Fee | $50 – $150 per cabinet | $0 |
| Specialist Tools | Included in service | $200 – $500 (One-off purchase) |
| Typical Total (Medium Kitchen) | $2,500 – $5,000+ | $200 – $600 |
By choosing the DIY route, you can redirect these savings into higher-quality finishes, such as stone benchtops or premium appliances, without exceeding your total renovation budget.
With the costs and materials understood, the next step is ensuring your space is ready for the arrival of your cabinetry. Proper preparation is the difference between a seamless build and a frustrated week of troubleshooting.
Essential Planning and Preparation for Your Kitchen Layout
A successful flat pack kitchen installation begins with establishing a precise “datum line.” Because most floors are not perfectly level, you must use a laser level or spirit level to identify the highest point of the floor along the cabinet run. From this point, measure up to your desired bench height (standard Australian height is usually 870mm–900mm) and mark a level line across all walls where the units will sit.
It is best practice to start the installation from a corner cabinet or a tall pantry unit. These act as the anchor points for the rest of the layout, ensuring that the entire run of cabinetry remains square and aligned as you progress through the kitchen.
Stability is the most critical factor in cabinet longevity, especially once heavy stone or laminate benchtops are added. You must ensure that every cabinet is anchored into the structural framework of the home rather than just the plasterboard. Adhering to professional Kitchen Installation Guidelines (Master Builders Australia) ensures your renovation meets local structural standards.
In many Australian homes—particularly older properties—walls are rarely perfectly flat and corners are seldom exactly 90 degrees. If you force a cabinet flush against a bowed wall, the cabinet carcass will “rack” (twist), which makes it impossible to align the doors and drawers later.
The professional solution for managing these irregularities is the use of plastic or timber shims (wedges).
[insert diagram showing shim placement between cabinet back and uneven wall here]
With the carcasses securely anchored and leveled, the installation can transition from the structural wall phase to the internal assembly and finishing environment.
Choosing the right environment for your flat pack kitchen installation can dictate the efficiency of your workflow. While most installers prefer a controlled environment, each location offers distinct advantages depending on your space and transport options.
Workshop Assembly
On-Site Assembly
A professional finish is defined by precision in the smallest details. Inconsistent spacing between doors or panels is a common error that can undermine the quality of high-end [flat pack kitchens](https://pinnacleflatpacks.com.au/flat-pack-kitchens/).
You must maintain a standard expansion gap of 2–3mm between cabinetry and adjacent walls or end panels. This margin is essential to accommodate the natural expansion and contraction of materials caused by humidity changes.
Using these precise measurements ensures that doors and drawers operate without friction. It also provides the necessary tolerance for final hinge adjustments once the weight of the countertops is applied to the carcasses.
[insert diagram showing 2-3mm gap placement for cabinet doors and panels here]
If you encounter uneven walls during this phase, refer to our installation guides for advanced scribing techniques. These gaps are your primary defense against structural binding over the life of the kitchen.
Proper gap management sets the stage for a seamless transition into the next phase of your project: Essential Planning and Preparation for Your Kitchen Layout.
The final 10% of a flat pack kitchen installation is what separates a DIY project from a professional-grade renovation. Precision in the finishing stages ensures longevity and the high-end aesthetic you expect from Pinnacle Flat Packs.
Even with rigorous quality control, issues can arise during transport or unboxing. Address these scenarios immediately to avoid stalling your installation:
To elevate your kitchen to a designer level, focus heavily on perfect alignment and the surgical placement of hardware.
Site cleanup is a functional necessity that prevents damage to your new surfaces during the final stages of the build.
[insert checklist graphic for final kitchen inspection here]
Achieving this level of finish requires a solid foundation. If you are just starting your journey, ensuring your space is ready for these professional touches begins with Essential Planning and Preparation for Your Kitchen Layout.
Modern flat pack kitchen installation is no longer a compromise between cost and quality; it is an exercise in manufacturing precision. High-end aesthetics are fundamentally driven by exact tolerances. By utilizing CNC-machined components that ensure every cabinet sits perfectly flush, the DIY assembly process results in a seamless, professional finish. When the engineering is perfected at the factory level, the gap between “flat pack” and “custom-built” disappears.
Aesthetics are only as good as the structural integrity beneath the surface. True high-end kitchens maintain their “new” look through the use of High Moisture Resistant (HMR) materials and robust, Australian-made cabinetry. This durability ensures that doors remain aligned and drawers operate smoothly long after the initial installation. By choosing precision-engineered [flat pack cabinets](https://pinnacleflatpacks.com.au/), you are investing in a foundation that supports premium stone tops and designer hardware without structural fatigue.
[insert comparison table of custom cabinetry vs. precision modular features here]
Your renovation goal is a balance of luxury and logic. Modular assembly allows you to reallocate your budget from expensive onsite labor toward [premium colours and finishes](https://pinnacleflatpacks.com.au/colour-and-finishes/). By taking control of the installation, you bridge the gap between affordability and sophisticated design. This approach proves that a DIY kitchen can deliver a magazine-quality result when the components are designed for exact fitment and high-end visual appeal.
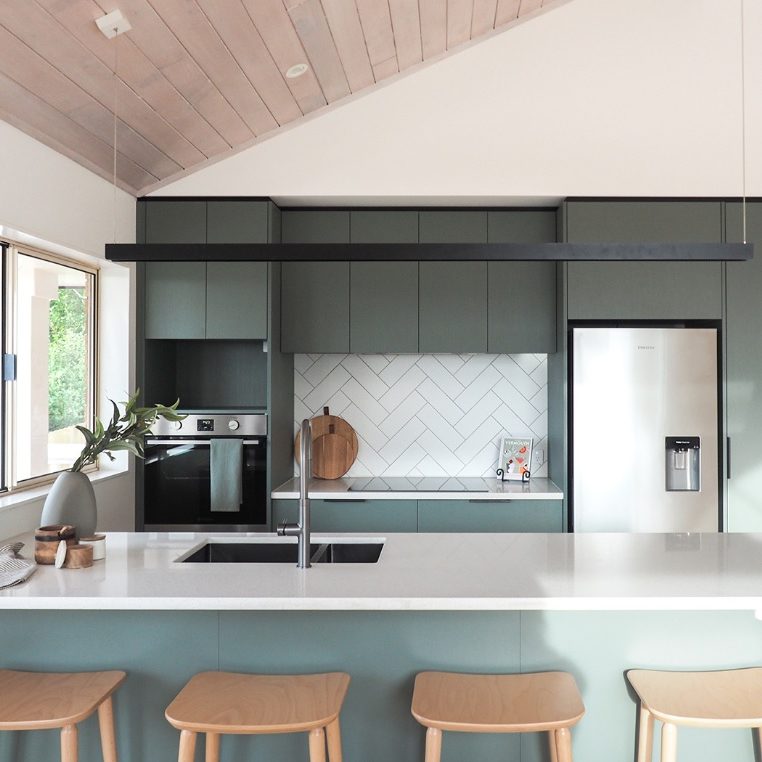
[insert high-resolution photo of a finished DIY modular kitchen highlighting seamless joins here]
While you can manage the assembly and positioning of the cabinetry yourself, Australian regulations require licensed plumbers and electricians for all utility connections. This includes tasks like connecting sinks, taps, gas lines, ovens, and lighting to ensure your home remains compliant with safety standards and insurance policies.
Two people are generally required for a safe and efficient installation process. A second person provides the necessary support for lifting heavy tall units, holding overhead cabinets steady during the leveling process, and assisting with the precise alignment of adjacent carcasses.
Cabinets can certainly be installed over existing floor tiles as long as the floor is stable and relatively flat. Most modern flat pack systems utilize adjustable legs that allow you to compensate for minor subfloor variances, though significant slopes might require leveling compounds or more substantial packing.
Starting in the corner is the most effective way to manage alignment issues in rooms that are not perfectly square. By establishing this corner as your fixed starting point and using plastic packers to shim the units away from uneven walls, you create a perfectly straight run for your benchtop to sit upon. Achieving this level of precision ensures that the foundational structure of your new space is ready for high quality components and a professional finish.
Ready to start your kitchen transformation? Explore our range of premium Australian made flat pack kitchen cabinets and get an instant quote today to see how affordable your dream kitchen can be.
Got questions about our products or need guidance with your order? Reach out to our friendly team for expert advice and personalised support. We’re here to make your flat-pack experience seamless and stress-free.
Fill out the form below, and we’ll be in touch soon!